 If you want to learn How to Throw a Four-Seam Fastball then this is the article for you!
The four-seam fastball stands as a cornerstone pitch within the sport of baseball, serving as a critical element in the arsenal of pitchers across all skill levels. This pitch is renowned for its speed and direct trajectory, making it a preferred choice for striking out batters or controlling the game's pace. In this comprehensive guide, we will delve into the essential mechanics of throwing a four-seam fastball, explore a variety of grip techniques, and discuss the subtle modifications that can influence the pitch’s behavior in flight.
Understanding the fundamentals of the four-seam fastball is vital for pitchers who aspire to elevate their game. Mastery of this pitch not only increases a pitcher’s effectiveness but also enhances their ability to dictate game situations. Whether you are a novice just starting out or an experienced player refining your skills, grasping the intricacies of the four-seam fastball is indispensable. Through this exploration, you will gain insights into optimizing your grip, perfecting your throwing technique, and making precise adjustments to your pitch delivery, all aimed at improving your overall pitching performance.
What is a Four-Seam Fastball?
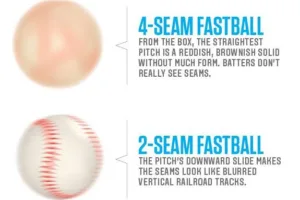
The four-seam fastball is known for its speed and relatively straight trajectory. It's named for the way the ball rotates, showing four seams per rotation, which helps maintain a faster, straighter path compared to other pitches.
Characteristics of a Four-Seam Fastball: How to Throw a Four-Seam Fastball?
- High Velocity: Generally the fastest pitch a player can throw.
- Straight Trajectory: Minimal movement, making it a reliable strike pitch.
- Backspin: Creates a rising effect, making it difficult to hit.
 Fundamental Four-Seam Fastball Grip: How to Throw a Four-Seam Fastball?
The standard grip for a four-seam fastball involves placing the index and middle fingers across the seams of the baseball, allowing for maximum backspin and velocity upon release.
How to Grip the Ball
- Position Your Fingers: Lay your index and middle fingers across the baseball's seams.
- Thumb Placement: Your thumb should rest underneath the ball, directly in line with your middle finger.
- Pressure Points: Apply even pressure with your fingertips, not the palms.
Advanced Four-Seam Fastball Grips
While the basic grip is effective, exploring variations can enhance a pitcher’s control and the pitch's unpredictability.
Variations in Grip:
- Closer Finger Placement: For a tighter spin, bring your fingers closer on the seams.
- Wider Finger Placement: Spread your fingers slightly for more control and less speed.
- Thumb Tucking: Adjusting the thumb position can influence the ball’s stability and release angle.
Adjusting Pitch Movement
Even minor changes in grip and release can significantly affect the movement and effectiveness of your four-seam fastball.
 Techniques to Modify Movement:
- Increase Backspin: Focus on snapping your wrist upon release to increase the backspin, which can slightly elevate the pitch’s trajectory.
- Alter Release Angle: Experiment with different release points to find the best angle for optimal pitch control and velocity.
Common Pitfalls and How to Avoid Them
Learning the correct technique is just one part of mastering the four-seam fastball. Avoid common mistakes to improve consistency and effectiveness.
Common Mistakes:
- Over Gripping: Holding the ball too tightly can reduce its spin and speed.
- Inconsistent Release Point: Varying release points can lead to control issues.
- Poor Body Alignment: Misalignment can affect accuracy and velocity.
3X Pitching Mechanics
3X Pitching Mechanics emphasize a comprehensive approach to developing a young pitcher's skills from the ground up. By integrating specific kinetic movements, young pitchers can harness greater power, control, and velocity in their throws. Here’s a breakdown of the key components of 3X Pitching Mechanics tailored for youth:
 Lift Leg Momentum: Building Power from the Ground Up
Lift leg momentum is the initial phase in a pitcher's motion where the leg is raised off the ground. This critical movement sets the stage for a strong pitch delivery by creating a solid base that generates lower-body power.
Key Focus Areas for Lift Leg Momentum:
- Maintain a neutral stance with feet shoulder-width apart to ensure balance and stability.
- Lift the lead leg smoothly and controlled, bringing the knee up toward the chest to harness potential energy.
- Avoid excessive lateral movement or leaning back, as these can disrupt balance and reduce power output.
Solid lift leg momentum helps young pitchers establish a robust foundation for their pitching mechanics, which is essential for achieving maximum velocity and precision.
 Load Position: Preparing for the Explosive Drive
The load position marks the transition from lift leg momentum to the dynamic drive toward home plate. This phase is crucial for storing energy in the muscles and tendons, which will be converted into explosive power.
Tips for Optimizing Load Position:
- Keep the upper body upright and aligned over the drive leg to stack energy efficiently.
- Flex the drive leg at the knee and hip to build a strong, secure base.
- Position the glove arm in a balanced and relaxed stance, ready to initiate the pitching motion.
Mastering the load position allows young pitchers to effectively channel stored energy into a powerful drive towards the target.
 Triple Extension and Hip and Shoulder Separation: Enhancing Power
Triple extension and hip and shoulder separation are pivotal for maximizing power and velocity in pitching.
Triple Extension: Involves the explosive extension of the ankle, knee, and hip joints of the drive leg, pushing off the rubber to create a whip-like effect that propels energy through the kinetic chain into the upper body.
Hip and Shoulder Separation: This technique involves rotating the hips toward the target while keeping the shoulders closed. This action generates torque and maximizes the stretch reflex of the muscles, boosting power output and arm speed.
To Achieve Triple Extension and Hip and Shoulder Separation:
- Maintain a closed upper body while driving the rear hip toward the target.
- Engage core muscles throughout the pitch to maintain stability and control.
- Enhance hip and shoulder flexibility and mobility through targeted exercises, supporting greater separation and power.
Incorporating these mechanics helps young pitchers unlock their maximum potential, leading to more powerful and faster pitches.
 External Rotation of the Chest: Increasing Whip and Arm Speed
External rotation of the chest during the pitch helps optimize arm speed and creates a whip-like action that is crucial for throwing velocity.
Strategies for Enhancing Chest External Rotation:
- Ensure a relaxed and fluid arm motion while actively driving the chest forward during the pitch.
- Keep the throwing elbow elevated above the shoulder during the arm cocking phase to maximize rotational force.
- Avoid over-tensing the arm, as this can restrict movement and decrease pitch velocity.
Proper external rotation allows young pitchers to improve their arm speed and adds a level of deception to their pitches, making them harder for batters to anticipate.
 Internal Rotation Pronation: Improving Control and Command
Internal rotation pronation occurs after the ball is released, where the forearm and wrist turn to ensure a smooth follow-through. This movement is key for maintaining pitch control and accuracy.
Enhancing Internal Rotation Pronation:
- Pronate the forearm and wrist post-release to facilitate a clean follow-through motion.
- Strengthen the wrist and forearm through specific exercises and drills.
- Consistently practice maintaining a stable release point and follow-through to improve pitch accuracy and control.
By mastering internal rotation pronation, young pitchers can sharpen their ability to consistently hit targets and control their pitches effectively.
2X Stabilization: Ensuring Balance and Control Post-Pitch
2X stabilization focuses on the pitcher's posture and balance after the pitch is delivered. This phase is essential for minimizing stress on the arm and preparing for subsequent pitches.
Key Aspects of 2X Stabilization:
- Achieve a balanced landing with the lead leg slightly bent.
- Maintain an upright posture to prevent leaning or falling sideways.
- Quickly resume a ready position to prepare for the next pitch.
By adopting 2X stabilization, young pitchers can enhance their overall mechanics and reduce the risk of injuries, setting the stage for sustained success on the mound.
Ready to elevate your fastball to the professional level? Join us at the 3X Pitching Velocity Camp! Dive deep into advanced pitching techniques and learn from the best to develop a fastball that dominates. Don't miss out—secure your spot now at topvelocity.net/3x-camp and start your journey to pitching greatness!
Conclusion: How to Throw a Four-Seam Fastball?
Mastering the four-seam fastball is a blend of technique, practice, and slight adjustments. By understanding the fundamentals and experimenting with different grips and movements, pitchers can maximize their effectiveness on the mound.
FAQs: How to Throw a Four-Seam Fastball?
- What is the best way to increase the speed of my four-seam fastball?
- Focus on arm strength, mechanics, and a tight grip for increased velocity.
- Can grip variations really affect the pitch’s movement?
- Yes, subtle changes in grip can significantly alter the ball’s trajectory and spin.
- How often should I use the four-seam fastball in a game?
- It depends on your overall strategy and the hitters you face, but it's generally a good primary pitch.
- What is the main difference between a four-seam and a two-seam fastball?
- The four-seam is faster and straighter, while the two-seam has more movement.
- How can I practice improving my four-seam fastball?
- Regular bullpen sessions focusing on mechanics, grip adjustments, and consistent release points are essential.
For more exclusive content visit the TopVelocity Patreon!


 Fundamental Four-Seam Fastball Grip: How to Throw a Four-Seam Fastball?
 Techniques to Modify Movement:
 Lift Leg Momentum: Building Power from the Ground Up
 Load Position: Preparing for the Explosive Drive
 Triple Extension and Hip and Shoulder Separation: Enhancing Power
 External Rotation of the Chest: Increasing Whip and Arm Speed
 Internal Rotation Pronation: Improving Control and Command
